

Two ways to test a survey
To check the questions and the invitation email quickly, use Preview and Send Test E-Mail. For a full test run that puts data on a dashboard, duplicate the survey — that is described below.Preview
Preview shows the complete survey including the welcome text, and is available from every tab of the survey settings. Clicking it opens the survey in a new tab. The invitation email cannot be checked this way.Send Test E-Mail
Send Test E-Mail is only available in the Email Template tab. It sends you the real invitation email so you can click through the survey to the end.To send the email on to someone else, that person has to be a manager in the system and have access to this survey. Without that access they cannot test the survey.
Neither route submits any feedback. The run stops at the last question and the answers do not appear on the dashboard.
The full test run
Create a test survey by duplicating the existing survey
Please do not use the actual survey for testing. Instead, please create a duplicate by following these steps:- Select Create New Survey.
-
Choose Reuse an Existing Survey.
- Provide a name such as “Survey for Testing”.
- Choose the original survey as the source.
- Set the Anonymity Threshold to 1 to ensure test data appears on the dashboard, even if it is very little.
The Anonymity Threshold dropdown only lists the values that are configured for your account. If 1 is not available, an admin has to add it first under Settings → Account, tab Anonymity, section Anonymity thresholds for surveys — enter 1 and then save, as the page does not save automatically. Only admins see this tab. The full steps are in Adjust anonymity.
You can only set the anonymity threshold until the survey is activated for the first time — after that the field is locked. At a threshold of 1, open text answers are also visible from a single response, because the text threshold is capped to the survey’s threshold. You do not need a separate setting for that.
The survey banner, welcome and thank you messages and email text will all be taken from the original survey.
Inviting Test Participants
- Choose 5 to 7 people to participate in the test.
- In the distribution section , select the people you’d like to invite. You can either select participants manually or search for specific individuals.
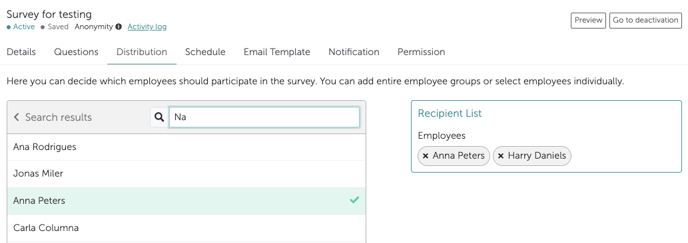
Adjusting the Schedule Settings
Enable multiple submissions by ticking the appropriate checkbox. This allows test participants to complete the survey multiple times, ensuring sufficient data is collected for dashboard analysis.
Activating the Test Survey
- Click Go to Activation.
- Choose to activate immediately or schedule activation and deactivation for a later time.
- For manual deactivation, monitor the test results and deactivate once testing is complete.
Viewing Test Results in the Dashboard
Creating a Dashboard
- Navigate to the dashboard section and select Add Dashboard.
- Name the dashboard (e.g., Survey Test Dashboard).
- Select the original survey as the data source for this dashboard as our duplicate was derived from it.
- Click Add.
Filtering the Dashboard for Test Results
- In order to only see the results of the test survey, apply a survey filter.
- Select the test survey from the drop-down list.
- The dashboard will now display only test survey results.
- Go to the Survey Section.
- Locate the test survey and click the Delete option on the right side.