
This video explains how it's done:
To import your employees via Excel, go to the "Employees" section and click on "Import Employees":

A window with further information will appear:

You are now shown 2 options:
The partial import updates your data and can be used with a smaller Excel list (only uploading new employees or updating existing users, for example).
The full import updates your existing data, but also permanently deletes all employees, who are no longer listed on your Excel sheet.
Please note: This deletion will not apply to any employees, who were added to the account manually.
By clicking on click here, you can download our template file and adjust your data according to the examples given:
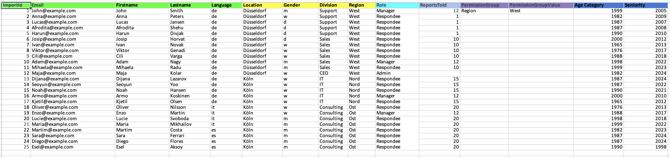
Once you have adjusted your file according to the template, you can easily upload it by clicking on Start import. It will be completed in just a few minutes.
Required Columns
The following columns must be included in the Excel file.
Please note: Column names must be entered exactly as shown below, or the import will fail.
| Heading | Description |
| ImportId (formatted as text/string!) | This is how we clearly identify each individual employee. It could be their personnel number. The system uses this ID to recognise each individual and update them in further uploads, if necessary. |
| The employee's email | |
| Firstname | The employee's first name |
| Lastname | The employee's surname |
Caution: The employee's individual ImportId can no longer be changed once it is assigned in the very first upload. In most cases, the personnel number of each employee is used.
Further Note: Always format the ImportID as text/string in Excel (ideally the entire column). This ensures that nothing goes wrong during import — for example, leading zeros will be preserved....
The employees' languages
| Language | ISO 639-1 |
The employee's main language will decide in which language their notifications and questions will appear. The ISO codes are explained here. |
Optional: Additional Employee attributes
In order to later be able to filter the data you collect and get more detailed insights, you will need to both configure all employee attributes in the Honestly account and then extend the file to include these as additional headings.
These attributes will appear as possible filters in the dashboard.
Please note: Attributes and their values can have a maximum length of 100 characters.
Optional: Roles and access rights
Employees can have access to survey data according to who reports to them using a “ReportsToId”. This can be used in conjunction with access to particular employee attributes, such as locations or departments.
If you choose to use "ReportsToId", "PermissionGroup" or "PermissionGroupValue" columns, it is fine to only enter information for some employees and not for others.
The "Role" column however must be completed for all employees.
| Heading | Description |
| Role |
This must be one of the roles found in the following table: "Possible roles". Every employee must be assigned a role. |
| ReportsToId | This is the ImportId of the person each employee reports to. |
| PermissionGroup | Contains the name of the column heading/attribute that controls the employee's entitlement, e.g. "Country". |
| PermissionGroupValue | Contains the specific employee group within that attribute to which the user has access, e.g. "Germany". Use * to give users access to all data. |
See more details here in this article: How Do Reporting Structures and Data Permissions Work in Honestly?
Possible roles
|
Name |
Description |
|
Admin |
Can do everything and has access to all data. The settings in PermissionGroups are not taken into account. |
| Manager | Can manage surveys & dashboards associated with the attributes specified in PermissionGroups and their hierarchy. |
| Analyst | Has read-only access to specific dashboards associated with the attributes specified in PermissionGroups and hierarchy. |
| Report viewer | Has read-only access to specific dashboards associated with the attributes specified in PermissionGroups and hierarchy. Cannot create exports and can only track results in the system. |
| Respondee | Does not have access to the web app. Can only receive surveys and answer them via the web or Engage app. |
Read more about the roles in your Honestly account.
Optional: Age groups and seniority
Employees can now be created in the system with their year of birth and start date; our system generates age groups and seniority groups for you.
Example: Age Category 1990 and Seniority 2024 in the import file would then be displayed in our system as follows:

Please note: The age category and seniority are automatically calculated based on the employee's year of birth and start date.
| Age category | YYYY Format, the categories would be as follows: for example, 1990 would be displayed as 30-39 in the system, 1980 as 40-49, and so on. |
| Seniority |
YYYY Format, the categories would be as follows, for example, 2020 would be displayed as <5: 2018 would be displayed as 5-10. |
The system creates the following groups automatically:
Age Category
<20, 20-29, 30-39, 40-49, 50-59, 60+.
Seniority
<5, 5-9, 10-14, 15-19, 20-24, 25-29, 30-34, 35-39, 40-44, 45+.
Follow these guidelines to ensure your import is successful.