> ## Documentation Index
> Fetch the complete documentation index at: https://help.honestly.com/llms.txt
> Use this file to discover all available pages before exploring further.
# How can I test my survey?
> This guide walks you through duplicating a survey, setting up a test version, inviting participants, and reviewing results before going live.
Before launching your survey, it's essential to test it with a small group (5-7 people), including team members and a few fresh eyes. This ensures email delivery, clarity of messages, and proper functionality of survey logic.
This video takes you through all the necessary steps:
####
### Create a test survey by duplicating the existing survey
Please do **not** use the actual survey for testing. Instead, please create a duplicate by following these steps:
1. Select **Create New Survey**.
2. Choose **Reuse an Existing Survey**.
 3\. Provide a name such as "Survey for Testing".
4. Choose the original survey as the source.
5. Set the **anonymity threshold** to 1 to ensure test data appears on the dashboard, even if it is very little.
The survey banner, welcome and thank you messages and email text will all be taken from the original survey.
### Inviting Test Participants
1. Choose **5 to 7 people** to participate in the test.
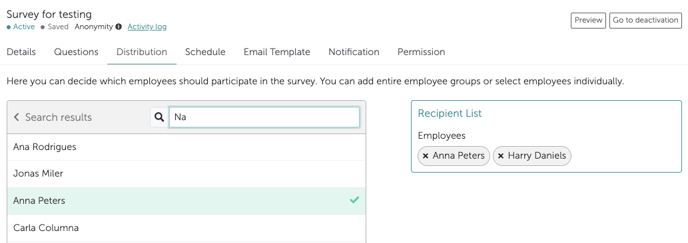
2. In the **distribution section** , select the people you'd like to invite. You can either select participants manually or search for specific individuals.
3\. Provide a name such as "Survey for Testing".
4. Choose the original survey as the source.
5. Set the **anonymity threshold** to 1 to ensure test data appears on the dashboard, even if it is very little.
The survey banner, welcome and thank you messages and email text will all be taken from the original survey.
### Inviting Test Participants
1. Choose **5 to 7 people** to participate in the test.
2. In the **distribution section** , select the people you'd like to invite. You can either select participants manually or search for specific individuals.
 ###
### Adjusting the Schedule Settings
Enable multiple submissions by ticking the appropriate checkbox. This allows test participants to complete the survey multiple times, ensuring sufficient data is collected for dashboard analysis.
###
### Adjusting the Schedule Settings
Enable multiple submissions by ticking the appropriate checkbox. This allows test participants to complete the survey multiple times, ensuring sufficient data is collected for dashboard analysis.
 ### Activating the Test Survey
1. Click **Go to Activation**.
2. Choose to **activate immediately** or **schedule activation and deactivation** for a later time.
3. For manual deactivation, monitor the test results and deactivate once testing is complete.
### **Viewing Test Results in the Dashboard**
### Creating a Dashboard
1. Navigate to the **dashboard section** and select **Add Dashboard**.
2. Name the dashboard (e.g., *Survey Test Dashboard*).
3. Select the **original survey as the data\*\*\*\*source** for this dashboard as our duplicate was derived from it.
4. Click **Add**.
### Filtering the Dashboard for Test Results
1. In order to only see the results of the test survey, apply a **survey filter**.
2. Select the test survey from the drop-down list.
3. The dashboard will now display only test survey results.
**Caution:** Before launching the actual survey, be sure to delete the test survey to prevent test data from interfering with real survey results.
1. Go to the **Survey Section**.
2. Locate the test survey and click the **Delete** option on the right side.
### Activating the Test Survey
1. Click **Go to Activation**.
2. Choose to **activate immediately** or **schedule activation and deactivation** for a later time.
3. For manual deactivation, monitor the test results and deactivate once testing is complete.
### **Viewing Test Results in the Dashboard**
### Creating a Dashboard
1. Navigate to the **dashboard section** and select **Add Dashboard**.
2. Name the dashboard (e.g., *Survey Test Dashboard*).
3. Select the **original survey as the data\*\*\*\*source** for this dashboard as our duplicate was derived from it.
4. Click **Add**.
### Filtering the Dashboard for Test Results
1. In order to only see the results of the test survey, apply a **survey filter**.
2. Select the test survey from the drop-down list.
3. The dashboard will now display only test survey results.
**Caution:** Before launching the actual survey, be sure to delete the test survey to prevent test data from interfering with real survey results.
1. Go to the **Survey Section**.
2. Locate the test survey and click the **Delete** option on the right side.